
Adam has done fantastic job installing our 3 exterior doors. The job was one of the more complicated ones that we have done. Doors need to be airtight, hang true and plumb, and also be properly flashed to protect them from water.

Our exterior door extension jambs put the door flush with the inside of the house so the door can open all the way in. This is the opposite of our window extension jambs, where the windows sit flush with the outside. A quirky way of differentiating this concept is doors are “innie” and windows are “outtie”.
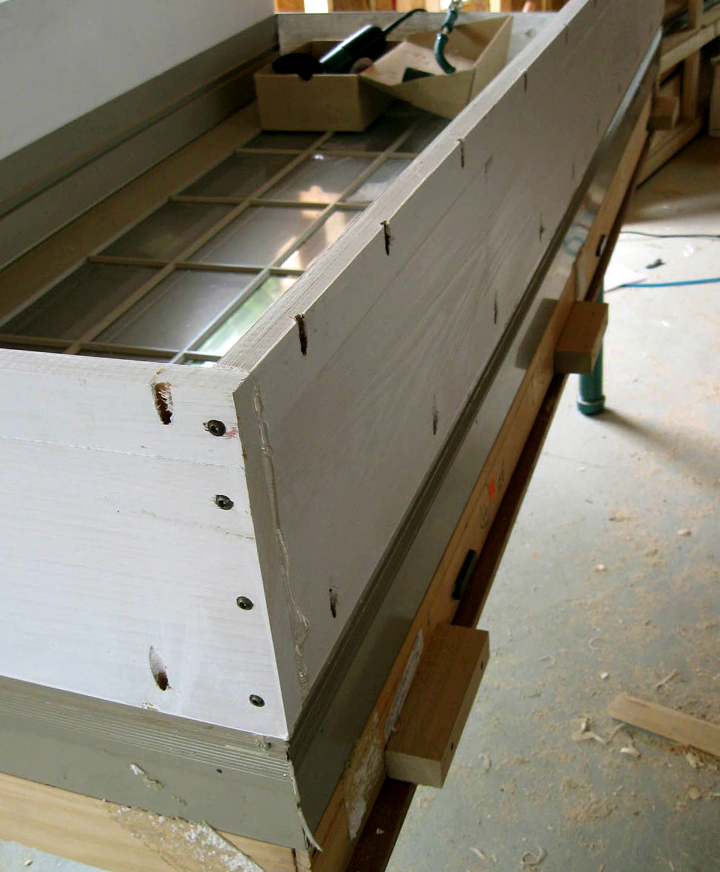
The extension jambs were attached to the aluminum clad door with Kreg screws and water proof glue. There is a second set of screws attaching a strip of wood near the outter edge because the piece of cypress that we used wasn’t wide.

In addition to extending the jambs of the door we also needed to extend the threshold. We did this using some of our granite counter top scrap. It is amazing what you can cut with a diamond blade on a circular saw. This is easily one of the loudest jobs we have done.

The stone dust is quite toxic, so we eventually worked out a way to capture most of it with Adam’s Festool shop vac.

The shop vac sucked the dust right up

We needed another large piece of granite for our third stone threshold so we made our second trip to the granite counter top manufacturer to get more scrap.

We used flex wrap tape for the stone threshold sill pan (the white area). Behind it is 1.5″ rigid foam insulation that the door will sit on. The foam will eliminate the thermal thermal break under the door. The copper flashing tape provides an impervious surface protecting the parged 2″ of foam that is on the exterior of the foundation.

We used copper for the door sill pan. The stone thresholds look really sharp.

Another detail to protect the doors from water. The saw kerf on the underside of the stone threshold is called a drip edge. Water clings to surfaces and can move horizontally along them, however it can’t move vertically (unless you consider capillary action).

Ordinarily doors and windows have flanges on them that seal them to the sheathing. Since we made our own extension jambs we also needed to make our own flange using a technique called back flashing. One uses two pieces of flashing taped together with about 1″ of overlap. The tape, which now resembles double sided tape, can now stick to both the jamb and the sheathing.

Hannah (with dinner) admiring our southern glass door. I had to put blue tape over the handle and lock set holes because bees immediately started to nest in them.

Installing a door lock

Our completed porch door entrance. This is the one that will see most of the foot traffic.

I suspect our Vernon St. door way is going to be in a home magazine some day.

Interior of Vernon St. door.

So beautiful! It’s so delightful to get to read (and see!) about your journey with this fantastic house!
You definitely set thoughts percolating!
The doors look great! This is the first site I’ve been able to find addressing huge extension jambs for exterior doors which is one of the issues I’m trying to work out. It looks like you guys fashioned the jambs out of 1x’s. Am I correct?
Hi Stephanie,
I am glad that the post has been useful to you. The extension jambs are cypress that we had bought rough and had planed. They ended up being about 7/8″ thick. We used cypress because it is rather rot resistant. If you have exterior doors well-shielded from the weather with protective roofs, as well as 6-sided primed and painted I wouldn’t worry about using white pine. I might have other photographs of the doors being installed. Let me know if you have any other questions.
-Spartan
Lessons learned: the copper flashing sill pan conducts so much cold into the building during the winter that frost develops on it. Not sure what I would do differently, but it creates a moisture problem against the wooden part of threshold.
Perhaps you could have cut the copper (that covered the rigid foam) sill back to only leave approximately 1″ lip on the exterior edge of the foam. Then used flashing tape (butyl) and lapped over the copper to the full depth on the inside. You would still maintain your drainage plane but now have a thermal break, especially on the wood base of the interior side of the threshold.
I am curious how sealed the door aluminum sill to the granite and copper… They look to be a slightly different elevations in the photo with the beige piece. Did you set the door directly on the copper sill on the interior, any shimming required? How did you seal the leading (exterior) lip of the sill to the granite? I am doing a similar install in a row house that is double brick with a 1-inch air gap and then 2×4 framing.
Hi Sam, Only just saw your comment on the blog–I thought wordpress was sending me email notifications for new comments. I think your suggestions to create a thermal break are good ones.
If I recall correctly, for the granite to the sill pan we applied 6″ beads of geocel caulk running in the direction of the way water would drain. We are counting on the granite captured on all except one sides to keep it in place.
For the connection between the aluminum threshold and the copper we again used geocel–this time to create an air seal. It was applied as far back as we could give water as much opportunity as we could to drain out. I don’t recall needing to shim–my memory is fuzzy on that one.
Sorry for the delayed response. I suppose you finished installing your door by now.
-Spartan
Thanks for the reply though I did install my door already… I put copper pan flashing with a fabric drainage plane face up. Poured a concrete sill with a 1/4″ / ft slope. I then placed Butyl flashing tape on the concrete sill with the leading lip about 1/2″ behind where the leading door sill lip would set. The Butyl ran from concrete sill to inside sub floor. I sealed the interface of the butyl and door sill with several bead lines of silicone. Both the butyl tape and copper flashing had damned ends running up the brick. I will see how well it works in about 3 months… water drainage has been great thus far.
not sure if you still reply to posts but I am curious about what doors you chose. I am a small builder about to start a deep energy retro fit on an old house. I am wondering what type of doors you chose to install. Wood? fiberglass? triplepane glass? etc. Thanks. Rebecca
We have three different types of exterior doors, all salvage. One solid wood, one double pane glass, one thermatru door with foam. All standard thicknesses.